“Heels Down!”

As a riding instructor, you find many ways to phrase things and many interesting ways to explain things.  Especially when working with beginners, certain things always seem to be brought to attention in any lesson.  One of the things that I find myself repeating over and over and over again is “heels down!”  Out of all of the repetitive phrases I use, this I believe is the most important to creating a stable rider who is able to advance in level and ability.  We know that a good hoof is crucial for a good horse, but I also believe a good heel is crucial to be a good rider!

With practice, your heel will sink down naturally.

With practice, your heel will sink down naturally.  

What is so important about the heel?   I have seen (and also experienced) more successful rides through spooks, bucks and bolts when riders keep their heels down.  I attribute this to several factors, the main one being the distribution of weight.  No matter what style of riding you are doing, your heel needs to be where your weight is.  By dropping your heel, you allow your weight to sink into your legs and the further down that you bear your weight, the more stability you will have in the saddle. If the heel is up and the toe is pointing towards the ground, the rider’s weight will most likely be settled in their rear end or higher, which forces them to do a balancing act on the saddle.   In this scenario, if a horse jumps to the side or bucks, the rider will have a harder time keeping their balance in the middle of the saddle and will end up clenching the horse’s sides with their legs in an effort to maintain their seat.  Many times, this just serves to spook or aggravate the horse further and sends the pair into a vicious cycle that ends with either the rider sitting in the dust or the horse (thankfully, in this situation) deciding that today isn’t actually when he wants to audition for the rodeo.  By dropping the heel, and therefore lowering the area where the rider is bearing their weight, when the horse is naughty, the shock is absorbed more easily and the rider is less likely to be displaced from the saddle.


Getting your heels down will be second nature after a while.

Dropping the heel also encourages better position in the upper body.  When the heel is down, I have found that riders are less likely to hunch or lean forward.  Let’s be honest, it can be scary to get up on that horse for the “beginner” phase of riding (and sometimes well beyond!).  One of the body’s natural reactions to fear or nervousness can be to try to shrink away from the scary thing or tense up.  It goes against what your natural instincts tell you to do to let your heel drop down in the stirrups and pull your shoulders back.  Therefore, it is one of the things that riders need to be reminded of often before it becomes second nature.

This is a horse who would have definitely had something to say about being jabbed in the side.  Melissa's good lower leg and heel position allows her to correct Concorde with other aids without being distracting.

This is a horse who would have definitely had something to say about being jabbed in the side. Melissa’s good lower leg and heel position allows her to correct Concorde with other aids without being distracting because of a swinging or clenching leg.

The last big issue I find associated with the heel is gripping and clenching of the lower leg.  Your leg is an aid for directing and guiding your horse.  If a rider’s heel pops up, oftentimes it begins to bump, dig into or clench on the horse’s side.  This is not only aggravating for the horse, but confusing for him also.  Some horses need continual pressure on their sides to be motivated to go forward – especially some of the dead-broke school horses you often try to place beginners on – but the pressure needs to come from a proper application of the entire lower leg against the horse’s side rather than a fear-induced stabbing of the heel into the innocent creature’s ribs.  Additionally, when the rider does get on a horse which does not need as much motivation to move forward, boy are they in for a *treat,*  so it’s best to fix the problem before it ever has a chance to really become one!  Keeping the heel down allows for a steady pressure and a leg that doesn’t swing out of place.

Bryn -- heel

“Heels down!”  “Toes towards the sky!”  ” Let your weight sink in your heel!”  “Pull your toes up!” “HEELS!!!!!”  However you choose to say it, never underestimate the importance of the heel!! 🙂


What is my horse’s muzzle telling me?

To be a good horseperson  you have to learn to listen to your horse.  Horses are very good at communicating with us, if we know what to look for.  Body language is the main way your horse talks to you, so you need to understand it to be able to respond.  In this post, we will look at some of the ways that a horse uses his muzzle to tell us how he is feeling.

Relaxation

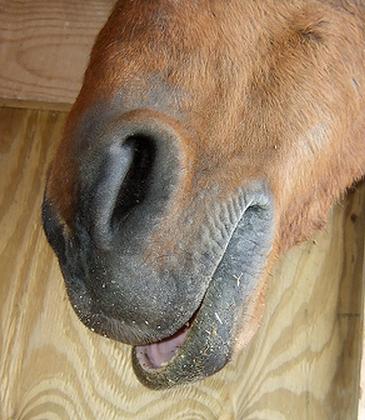
Relaxed, droopy lip

Relaxed, droopy lip

When your horse is very content and relaxed, you may see his lower lip sag.  I see this a lot when I give GQ a nice long rub down with a rubber curry.  He loves the way it feels and he often lowers his head and his lip droops.  This can also happen when they are napping, so if you aren’t actively working with your horse and you see this, make sure to let him know you are there so you don’t spook him! You will also see their lip sag if they are sedated by the vet for anything like dentals, sheath cleaning, etc.

Tension 

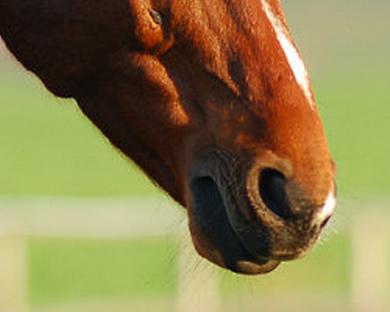
Tightening of the lips can be a sign of stress.

Tightening of the lips can be a sign of stress.

Sometimes this is a very subtle change, which is why its important to know what is normal for your horse.  If you happen to notice your horse tightening the muscles in his muzzle or pursing his lips, it could be a sign of agitation or stress.  If you see this happening, try to give him something else to think about so that the action doesn’t progress into something more severe, like biting or kicking.

Concentration

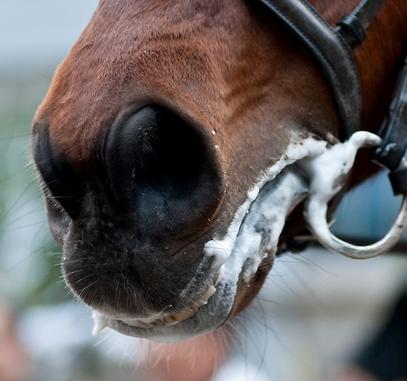
When your horse is working the bit in his mouth, it may create foam from excess saliva.

When your horse is working the bit in his mouth, it may create foam from excess saliva.

When your horse chews without having food in his mouth, it is often a good sign.  In training it can mean that he is relaxed and concentrating on the task you have given him.  If he is working the bit in his mouth, it will encourage saliva production, which is desirable.  Sometimes this can cause his mouth to foam, even if he isn’t working too hard.

Flehmen

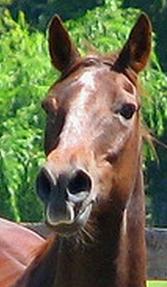
Yes, this goofy looking action has a name and a purpose!

Yes, this goofy looking action has a name and a purpose!

When a horse lifts his lip up over his nostrils, he isn’t just being silly.  He is trapping a strange scent in his nostrils to assess what  it is and get more information.  Oftentimes you see stallions flehmen if they are determining if a mare is in heat and ready to breed, but any horse will do it with a scent that is unusual to them. There is a structure in the nose called a vomeronasal organ (VNO) through which scent particles travel and help the horse assess what they are smelling.

Nervousness

Flared nostrils can indicate fear or nervousness

Flared nostrils can indicate fear or nervousness

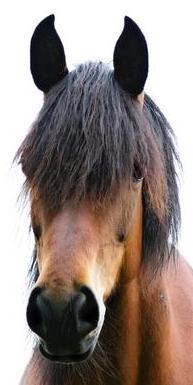
When a horse flares his nostrils (and he hasn’t just exerted himself excessively), it can be a sign of nervousness or being startled.  It is often accompanied by a raised head and sometimes tension in the eye and/or muzzle (notice the pursed lips in the above picture).   It is usually a fairly quiet action, but it is best to divert him from it by giving him a different task to focus on so that it doesn’t escalate into something more serious.

Pain, aggression

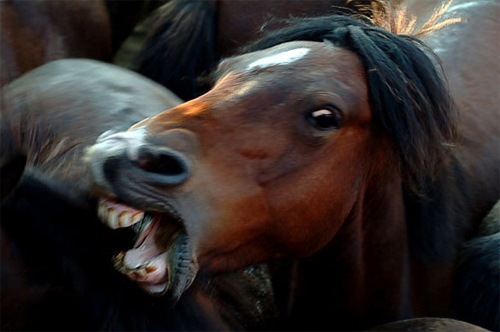
This horse is about to bite. BEWARE!

This horse is about to bite. BEWARE!

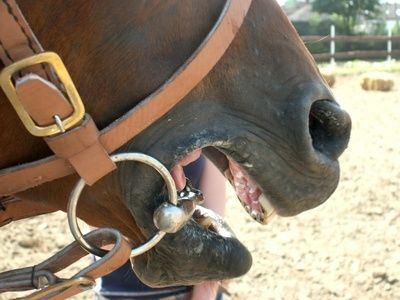
Gaping can sometimes indicate pain

Gaping can sometimes indicate pain

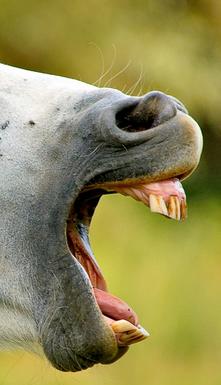
Be wary of choke.

Be wary of choke.

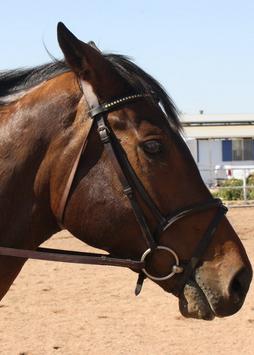
A horse gaping his mouth open with teeth showing can indicate a number of things.  It can be a sign of extreme aggression, as in the first picture.  A horse who is this angry has often given several more subtle signs of agitation before resorting to biting, which is why it is important to notice the small things! If your horse is gaping with a bit in his mouth, it might indicate pain.  Check to make sure that your bridle is put together properly and that your bit fits your horse’s mouth and isn’t pinching.  If that’s all okay, schedule a dental exam to make sure his teeth aren’t hurting.  Finally, if you every see your horse gaping with his neck outstretched when he’s eating, he might be experiencing choke, which means his esophagus is obstructed.  Take away any uneaten food and call the vet right away.

What are my horse’s eyes telling me?

To be a good horseperson  you have to learn to listen to your horse.  Horses are very good at communicating with us, if we know what to look for.  Body language is the main way your horse talks to you, so you need to understand it to be able to respond.  In this post, we will look at some of the ways that a horse uses his eyes to tell us how he is feeling.

Content and alert

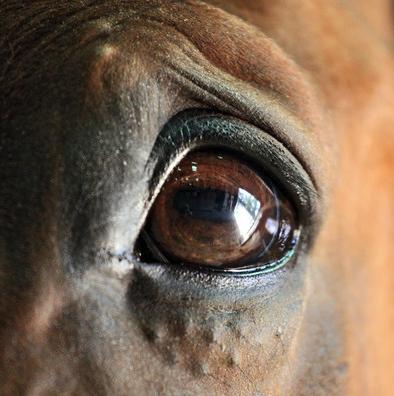
A bright eye that is content and alert

A bright eye that is content and alert

When your horse is happy and aware, his eyes will be bright and focused. They will move often, but not frantically, to take in his surroundings.  When this is the case, his ears will usually be attentive as well, moving casually to tune into what is happening around him.

Nervous or tense

Know what is normal for your horse, so that if he is ever nervous you can pick up on it.

Know what is normal for your horse, so that if he is ever nervous you can pick up on it.

Wrinkled upper eyelids and worried looks can be signs of tension and nervousness

Wrinkled upper eyelids and worried looks can be signs of tension and nervousness

Tension in the corner of the eye and wrinkles in the upper eyelids can be signs of nervousness, fear or discomfort.  Make sure you are familiar with how your horse looks when he is happy and content so that you can pick up on these changes if and when they occur.  Sometimes the change is subtle, but if you are able to see it, you can prevent something more extreme or dangerous from happening. If your horse’s eyes begin darting back and forth frantically, it is usually a sign of fear and he is probably looking for the best way to make his escape from the scary situation.

Fearful or aggressive

Extreme fear and aggression can be expressed in the eyes.

Extreme fear and aggression can be expressed in the eyes.

Fear and anger can both make a horse frantic

Fear and anger can both make a horse frantic

In some horses, the sclera(white of the eye) is visible all the time.  This is another reason to know what is normal for your horse.  If your horse is worked up enough that the whites of his eyes are showing or more exposed than normal, he is pretty upset.  If it is paired with with pinned ears, its usually a sign of anger.  Paired with snorting, it can indicate fear.  In any case, it takes quick thinking and confident handling to distract him from whatever is making him react so negatively.

Closed

Nap time!

Nap time!

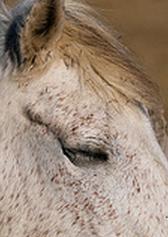
If his eyes are closed, your horse is probably resting or napping.  Make sure you talk to him before getting to close so you don’t startle him and make him spook.  If only one eye is closed though, or he seems agitated, he might have done something to his eye.  If there is an eye injury, call the vet immediately.

What Are My Horse’s Ears Telling Me?

To be a good horseperson  you have to learn to listen to your horse.  Horses are very good at communicating with us, if we know what to look for.  Body language is the main way your horse talks to you, so you need to understand it to be able to respond.  In this post, we will look at some of the ways that a horse uses his ears to tell us how he is feeling.

Alert and Erect

Alert ears

Alert ears

Ears which are forward and pricked upright, as shown above, indicated a horse who is focused and aware of his surroundings.  He is ready to react to whatever comes his way, or whatever he thinks is coming his way.  If your horse is this focused on something, it might be difficult to divert his attention.  Try to turn him elsewhere or give him a job to do if he seems to be getting tense.  When your horse is alert, you must be as well because you don’t know how he might react to whatever has his attention.

Relaxed

Relaxed ears

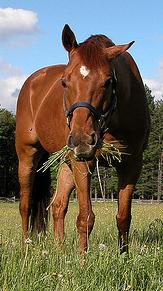
Relaxed ears

Here is a horse who is completely at ease with his surroundings.  He is aware of what is going on around him, but is content to simply munch his grass. When you view a horse whose ears are a little floppy, you’re viewing a horse who is comfortable with his environment and whatever is going on around him.  This is something that I love to see when I ride, because I feel like my horse and I are truly connected.  If my horse is relaxed enough around me to let his ears flop a little, I feel that true trust has been established between us.  One thing to be aware of when your horse has his ears relaxed is that he might be napping.  If he’s by himself and seems relaxed, make sure you talk to him to let him know you’re there so he doesn’t get spooked or taken unaware when you get to him!

Attentive

Attentive ears

Attentive ears

These are ears which are attentive to what is going on, but in a way in which will keep the horse responsive to you as well.  Unlike the alert ears in the first example, this is something you will see when a horse is focused on you.  Often times, if you talk to your horse from the saddle, or as you walk along beside him, you will see one or both of his ears twitch in your direction.  It is good to see him respond to you like this. Its a good way to know you have his attention.

Unhappy

Unhappy ears

Unhappy ears

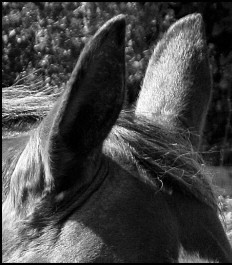
When ears start to tilt backwards, you’re getting into unhappy behavior.  Sometimes your horse will give you a warning that he is uncomfortable or unhappy with an action.  You may also see his ears twitch rapidly back and forth which could be a sign of uneasiness or tension.  Pay close attention to ears that start to go back and adjust what you are doing or stop altogether and do something new.  If ignored, this signal could lead to more aggressive behavior, like biting or kicking.

ANGRY!

Angry ears - pinned

Angry ears – pinned

Beware of a horse who has his ears pinned! This is an aggressive behavior which is often the precursor of a bite, kick or charge.  Pinned ears equal an angry horse.  Stop whatever action you are doing immediately and if he does not calm down, get out of his way.   If you are riding and he has his ears pinned, he may be showing signs of pain, if the action doesn’t cease when you change your activity.  Check to make sure there is nothing poking him from your tack, make sure everything fits him properly and if he’s still pinning his ears, have a vet out to check him over — he might have back pain or something else causing him discomfort.

Above the Influence: Corners

One of the most important parts of any ride is balancing your horse through a turn.  When your horse rounds a corner, you can help make sure that he is balanced and strong.  It might seem like a minor detail, but being balanced through a turn can mean the difference between a mediocre ride and a fantastic ride whether you are in your backyard or an arena of scrutinizing onlookers.

When your horse is balanced going around a bend, it will give a more powerful, steady ride.  It may take a lot of help and support from you at first, but it will eventually become something your horse does naturally and will increase his strength and self-carriage through all aspects of your riding.  Start off with this exercise at the walk and work up from there.  Keep in mind that if this is something neither you nor your horse are used to doing, it will be a lot of work at the start, but if you work at it a little every time you ride, it will get easier before you know it!

Anky van Grunsven and Salinero

To ride a balanced turn, you first have to find your center of balance over your horse.  You don’t want to be leaning back too far or bent over his neck in front of the saddle.  Your body should be upright and supple.  Next, you need to get your horse to bend around the turn.  I’m not talking about a huge movement here.  Ideally, you want to see the outside corner of his eye as you are rounding the turn.  Don’t over-bend him so he is curled in a ‘U’ around your leg because over-bending him will actually make it impossible to balance.  By getting him slightly bent in the direction of the turn, you can push him in the direction you want to go with your legs and reins.  In order to bend him, you need to have firm contact with the reins.  You don’t have to be pulling his lips off his face, but you want to feel a nice line of connection from your hands, through the reins, to his mouth.  You will be using an inside opening rein to cause his head to tilt inward and allow his front end to move into the turn.  Be prepared with your inside leg to apply pressure at the girth to keep him from drifting into the center of the ring.

This horse has a nice bend and is sure-footed. You can see the power in his hindquarters as he pushes himself around the corner and doesn’t let his rider pull him.

You want to push your horse around the turn, not pull him.  What does that mean? That means, use your legs to push him as you round a bend and move him up into your hand.  The weight (pressure) applied with your legs should be just a little stronger than the weight applied with your hands so that you help hold your horse together and balance him as he turns a corner.  When most of us learn to ride, the easiest way to learn to steer is by using either a direct or leading rein to turn your horse in the direction you want to go.  To ride a truly balanced turn, you need to add leg to the equation.  Use your inside leg to push your horse’s hindquarters through the turn and your outside leg to keep the energy up through the turn.  If your horse is very responsive to your legs, the pressure will be almost even, with a slightly greater weight on your inside leg.  If your horse is not the most responsive your your leg, it might take a little bit of effort at first to help him push his hind end around the corner.   Keep in mind though that you have to be aware of where his hindquarters are going.  You don’t want to push so hard that they end up swinging around the turn and ending up on the outside so he is on an angle when you complete the turn.  If this happens, use a little more pressure with your outside leg, slightly behind the girth.  Be aware of the position you are in though.  If you are walking or trotting, you are putting your legs into the position for cantering, so be prepared to add a little extra weight in your hand to keep your horse from changing gait!

If your horse tends to stumble or trip, especially around corners or circles, I’ll wager a bet that its because he’s not balanced.  If you can help him balance himself as he rounds a bend, you will begin to notice a more sure-footed, energetic horse underneath you.  No matter what your discipline, helping your horse learn to be balanced will make your ride much more enjoyable for everyone involved!

This seems like a big chore for something that seems so insignificant, but if you start thinking about a balanced corner every time you have to turn, you will find that it helps strengthen and support both your horse and yourself and it will create an easier ride every time.

The smaller the turn you make, the greater your contact must be. Keep your eyes up and looking where you want to go. Keeping your head up also helps you stay balanced which positively affects your horse’s balance around the turn.

Lynn Palm, the rider in the second picture also has a great article on this topic, found HERE.

Above the Influence: The Aids

Before we can talk about how our aids and cues effect the movement of our horses, it is important to understand what the aids are that we have at our disposal.

The first kind of aids are pretty straight forward.  Natural aids are the aids that, conveniently enough(!), nature provided us with.  They include your hands/arms, seat, voice, legs and brain.  Many times we don’t even realize how greatly we are effecting our horse’s movement simply by shifting our weight in the saddle, tensing a leg muscle or tightening/loosening our grip on the reins. Even the way that we hold our heads have an incredible effect on the movement of our horse.  Have you ever wondered why your riding instructor tells you to look where you want to be going? It’s because the motion of turning your head affects the position of your spine and subsequently, the way your weight is dispersed is effected. Your horse will sense all of that going on on his back and react to it (most of the time!). Your legs have the ability to get a horse moving and keep him moving.  Your arms and hands are an extension of the reins, connecting you  directly to your horse’s mouth to help guide him.  Your vocal tone can urge a horse forward or help calm him to slow him down or stop.  The voice is an aid that is often misunderstood.  Some people think a horse connects an action to a word.  That isn’t really the case.  They react to the intonation that you use.  To get your horse to go faster or get a little more peppy, your voice needs to be a little more harsh, clipped and higher.  If you want your horse to calm down or stop, your voice needs to be lower in pitch and softer in tone.  It doesn’t matter if you say ‘Yah!’, ‘Giddy-up!’, ‘Whoa!’, ‘Ease up!’ or ‘Mustard!’ If your voice is the right tone, your horse will respond accordingly.  My riding instructor actually did use various condiments one day to prove that it isn’t the word, but the intonation that a horse will respond to.

Our bodies are the best aids available to us!

The next kind of aids are artificial aids.  These are the aids that don’t come naturally installed in our body! Crops and spurs are the most common artificial aids that we see.  These aids should work as an extension of your natural aids by adding a little more ‘umph.’  So if you have a horse that isn’t listening to your leg when you say ‘move your body’, you can add a spur or a crop to get them to pay attention.  It is important, however, that your spurs and crop are used correctly, or they become cruel.  The proper use of a crop is behind your leg, not on the shoulder! Why? The crop is there to mimic the pressure of your calf when you ask a horse to move, whether it is sideways or forward.  The crop should be used behind the dominant leg in a movement or on the outside and it should be used on the barrel of your horse, not his flank or rump.  Using a crop correctly will get you faster results than if you just mindlessly beat on him when he doesn’t do what you want — that is not the purpose of a crop.  The crop is not a tool to take out frustration on your horse.  It is a form of positive punishment.  If you’ve ever taken any basic psychology classes, you’ve probably learned about positive and negative punishment and positive and negative reinforcement.  ‘Punishment’ is a word that many people don’t like, but in a psychological context, it simply refers to the decrease of an unwanted behavior.  Positive punishment is adding an unwanted stimulus (the crop) to decrease an unwanted behavior (ignoring your leg.) The same idea is used with spurs.  Spurs should only be touching the horse’s side when you are using them for a purpose.  If you do not have the leg control to keep your toe forward to avoid hitting your horse with a spur every time he takes a step, you are not advanced enough in your riding to be able to use spurs effectively.  The action of a spur is to accentuate the action of your heel and leg in asking your horse to move to the side or forward.  In some Western settings, spurs are used to stop, but for my purpose and style of riding, I will not be hitting on this concept.  If your spurs are constantly hitting your horse’s side, you will end up with a very annoyed or angry horse and then eventually a horse who is completely unresponsive to any leg aids.  Therefore, be absolutely confident in the control of your legs before breaking out the spurs.

I’d also like to address the different ways in which we use the reins.  The most common and basic rein aid is direct.  This is usually what you learn when you get on a horse for the first time.  Pull the left rein to go left and the right rein to go right. Easy to understand and use.  Another one that might be introduced to you early on is a leading or opening rein.  It’s pretty much what it sounds like!  Opening the rein away from your horse while maintaining the same amount of pressure allows his shoulders to move into the space you have made.  Another rein aid is an indirect rein.  An indirect rein is used to influence the shoulder or hips.  Indirect rein in front of your horse’s withers will keep his shoulder from bulging out.  Indirect behind the withers will help keep his hips from bulging out. The indirect rein forces your horse away from the side on which you are implementing it.  Then you have a blocking rein, which is not used to elicit a movement, but to — as the name suggests — block a movement.  It is accomplished by holding the rein flush on your horse’s neck so that the space into which he is trying to move, is closed off from him.  When a rein is taken away from the side of your horse’s neck, it is an invitation for your horse to move into that space.  Different rein aids can and often are paired to get the movement that you are looking for.   In Western riding, neck reining is used, in which the reins are used in one hand and the touch of the rein tells the horse which direction to go.

There are also different placements for your legs.  Depending on where your leg is positioned on your horse, you will influence the way he moves and the amount of control that you have over him.  The most common placement for your leg is at the girth.  This is where you tell your horse to stop and go and where your leg should rest most of the time.  Your leg can also be in front of the girth or behind the girth.  To influence the placement of your horse’s shoulder for a movement such as a shoulder out, your leg might slide in front of the girth.  A leg behind the girth would have influence over additional speed, as in the canter; or displacing his hips, as with haunches in.  You legs can drive your horse by having more pressure than you are holding in your reins.  You can accomplish a holding leg to maintain a movement by balancing the weight in your rein and leg and you can use your leg to block an action by keeping equal or greater pressure in your leg as is in your rein.

Obviously this is just the tip of the iceberg for the aids, but as each segment comes up, we will delve into certain aids in greater detail.  Use this as a guideline to have a basic understanding as you make your way with me through this series: Above the Influence.

Above the Influence: An Introduction

One thing that my college riding instructor was very good at explaining was why you use certain aids (or cues, for Western people!) to get your horse to move, bend and speed up or down.  If you understand what part of the body your aid is effecting, you can get your horse to do just about anything for you.  So in this series,  I’d like to take some time diving into how we influence our horses from the saddle and explaining the ‘whys’ that go with the ‘hows.’  By understanding how the movements you make in the saddle effect your horse, you can become a much more controlled and effective rider and your skill level will increase drastically.

George Williams rides Rocher during the USEF Selection Trials for the 2008 U.S. Olympic Team. (June 19, 2008 - Photo by None/Getty Images North America)

Head Down!

Have you ever thought Gee, this would be a lot easier if his nose wasn’t brushing the barn beams! This seems to be a common complaint among horse people.

Here is a super handy little trick to teach your horse for those times when you need to see the top of his head or have access to his ears for clipping, bridling or general checks for overall health:

Standing next to your horse’s head like you would to lead, put a small amount of downward pressure on the lead rope.  Hold this pressure nice and steady until your horse lowers his head and then immediately release.  (I add the phrase “head down” when I teach it, although it is not entirely necessary.)  Even if he pops his head back up, give him a short reward (neck rub, treat, etc) and then do it again.  The first couple times you try this, even the slightest decrease in resistance to the pressure of the halter is cause for reward.  If your horse will consistently give in to the pressure, make it a little more challenging by not releasing pressure until his nose is even lower or give him less time to rest in between.  By asking him to put his head back down immediately when he raises it again, it teaches him that you want him to keep his head down.  GQ, my handsome dude, learned this idea very quickly and now I just give a featherlight tug on the lead and he puts his head down to my eye level and holds it there while I clip his bridle path or fiddle with his ears.

This is one trick that will make your life infinitely easier, I promise you that! Just remember:

  • Be consistent!
  • Remember that horses have a 3 second time limit in which they connect your reaction to their action, so be quick to praise when they are doing well or correct when they are wrong!

The Equine Eye: Monocular vs. Binocular Vision and Focus Issues

I believe that a major part of being an efficient rider is to understand how every part of the horse works.  If you don’t understand why a horse is reacting a certain way, you may end up punishing something the horse truly has no control over or brushing off some uncalled for action that is fully correctable.  One of the biggest issues that really bothers me is when people punish their horse for spooking.  Many of the reasons a horse spooks are found in his biological makeup and cannot be altered.

The equine eye is the largest orb found in any land mammal.  Therefore, the horse has the capacity to take in a large amount of visual information at once.  It also means that a horse’s retina (the part that transfers information to the brain via the optic nerve to form images) is much larger than any other land mammal and because of this any object that a horse sees will look roughly 50% larger to him than it would to us.  This is the first reason many things seem scary to your horse.

Now, as (I believe) is common knowledge, horses are animals of prey.  In the wild, they are the ones that are hunted.   Nature, being the wonderful thing that it is, supplied the horse ways of protecting itself.  One of these ways is having a very large visual field.  While most predators like humans, dogs and cats have 180° vision, horses have almost 350° of sight because of the placement of their eyes widespread on the side of their head instead of close together and in front.  However, the horse’s ability to take in so much visual information at once can also make the world seem like a scarier place.  A horse is made visually aware of something by movement, so trail riding on a windy day can make a horse seem a little more jittery than normal because there is SO much stimulating his sense of sight.

Humans are very used to looking at something and immediately knowing, with clarity, what the object in front of us is.  Our eyes have a sort of ‘auto-focus’ so that whether the object is 10 inches or 10 yards away, we can see it clearly by simply glancing at it.  The simple explanation for this is 2-parted:

  • 1) Our ciliary muscle in the eye is well-developed.  That’s the part that adjusts the shape of the lens allowing us to focus.  It works quickly to let our eye focus immediately.
  • 2) Our retina, like many mammals, is smooth and concave, allowing for even focus in the eye.

The horse has an incredibly underdeveloped ciliary muscle.  This means that it takes much longer for a horse to focus on something than it does for us.  Imagine the speed of using auto-focus on a camera instead of manual focus.  Also, the horse’s retina is concave, but the surface is not smooth.  This means that some parts of the horse’s eye allow for better focus and clarity than other spots, which is why a horse may lower or raise his head, or weave his head side-to-side when he is trying to see something.

Not only does the horse have to work hard to focus, he has to figure out what exactly he needs to focus on.  The human eye sees with binocular vision, meaning that our brain gives us 1 single picture from the information that both eyes take in.  A horse has a small binocular field of vision, but roughly 270° of a horse’s sight is monocular.  This means that the horse’s brain is receiving two images at once because each eye is sending a different picture.  Imagine watching side-by-side television and trying to focus on both pictures at the same time.  It is nearly impossible to clearly see one picture or the other without turning your head to look directly at it.  This is the way a horse’s vision works.  His field of binocular vision begins about 6 inches to a foot from his forehead and extends in front of him.  Keep in mind that those 6-12 inches are a blind spot, which is why a pat between the eyes may elicit a flinch or even full-fledged spook.  His monocular field of vision surrounds nearly the rest of his body, except for a small blind spot just next to his flanks and directly behind him.  By turning his head he can eliminate the blind spot on one side or the other.

The basics of how a horse sees

Knowing how a horse sees affects the way that we work with them.  Don’t get mad at your horse for spooking at something because even though you recognized it right away, it may have taken your horse by surprise and looked scary and fuzzy to him.  Always work from both sides of your horse so that he is used to a motion being performed on each side of him.  Because of monocular vision, an action done on one side will become an entirely new experience on the other side because the brain is getting a whole new set of images from the opposite eye, so don’t expect your horse to be perfect as soon as you change direction or sides.

Patience is key when it comes to effective work with horses.  You and your horse are capable of great things if you take the time to understand him!

Happy Trails

There is nothing more dangerous or annoying than a person who is unaware of proper trail etiquette.  To be fair, there are some things that many people do not think about while having a lovely ride on a sunny day.  Here are some of the basics to remember so that your trail experience is pleasant for both yourself and the people you ride with and encounter on the trail:

  • Stick to the edge of the trail.  Even if you can’t see anybody in either direction, its wise to keep your horse towards they side of the trail.  Bikers and joggers can come up quickly, seemingly out of nowhere.  Avoid collisions or a spooked horse by allowing room for other trail users to pass without issue.
  • Always walk when passing someone.  Whether you are passing another rider, a bike rider, walkers or joggers, take the pace down a notch.  By slowing your horse down to a steady walk, you allow him to evaluate the situation and will have less chance for a negative reaction from him.  If your horse spooks while you are passing someone, it becomes dangerous for both yourself and the other party involved.  Keep it safe by slowing it down.
  • Ride to the ability of the least experienced rider in the group.  If you are in a group of riders, no matter the size, do NOT do anything that any single person in the group is not comfortable with.  For example, a group of 4 riders go out and 3 of them are comfortable doing walk, trot and a little canter if there is a clear patch (which I will address later) but the fourth rider is not comfortable doing more than a little trotting here and there.  Don’t bully the fourth rider into trying to canter.  By asking a member of the group to do something they don’t feel comfortable with, you put everyone in the group at risk .  Ride to the lowest ability level or find a different group to ride with.
  • Along with the previous point, do not be afraid to admit that you don’t want to do something on the trail.   Your group should respect your request and not push you.  Gently remind them that you feel you may compromise the groups safety through a particular action and that you just want everyone to be safe and smart.
  • If you are going to head out on trail in a group, determine the ability and comfort level of the participants BEFORE leaving so that there are no shocks on the trail.
  • Do not canter in groups. Unless you are a very experienced horse person and everyone with you is also very experienced, avoid group canters on trail.  Horses are competitive by nature and will often try to be in the lead.  This can cause matters to get out of hand and cause injury.  If you are alone, and you feel like you just have to get in that one good canter, do it in an area which you can see for a good distance in each direction and only canter if there is no one within sight.
  • If it is starting to get dark when you are on the trail, make sure you have a flashlight and reflective vest so that people can see you.  This is especially important if you have to cross any roads to get to/from your trails.  There are reflective bands that you can put around your horse’s fetlocks as well, which may be useful.
  • Keep your cell phone with you in case of emergency.  Whether you keep your phone in your saddle bag or pocket, let it always be easily accessible in case something comes up.
  • Fly spray your horse and bug spray yourself.  The bugs can be much worse on the trail than anywhere else and I don’t know a single person who wants to be eaten alive while trail riding.  If you are focusing all of your attention on obnoxious bugs it leaves little ability to focus on what is going on around you.
  • Wear a helmet.  I know that it may seem silly on the trail, but you never know what is going to set off your horse and how he will react.  It only takes a fall from 3 feet to make someone a vegetable or kill them.  Protect your head!

I’m sure there are things I missed out on, but think these through and just remember to use your brain on the trail.  If you have to think about whether or not you should do something on the trail, its probably a fairly good indication that you shouldn’t. Best of luck and fun to you all! Happy Trails!